The Quick Answer
Most laptop-to-display connections take three steps:
- Connect an HDMI cable (or a USB-C to HDMI adapter if your laptop only has USB-C) from the laptop to the projector or TV.
- On the projector/TV remote, press Source/Input and select the right HDMI port.
- On your laptop, press Windows + P (Windows) or open Displays in System Settings (Mac) and choose Duplicate/Mirror.
If it doesn't work the first time, the fixes are further down — most "no signal" problems are the wrong input source or a loose cable.
Step 1: Find Out Which Port Your Laptop Has
Before anything else, check what's on the side of your laptop:
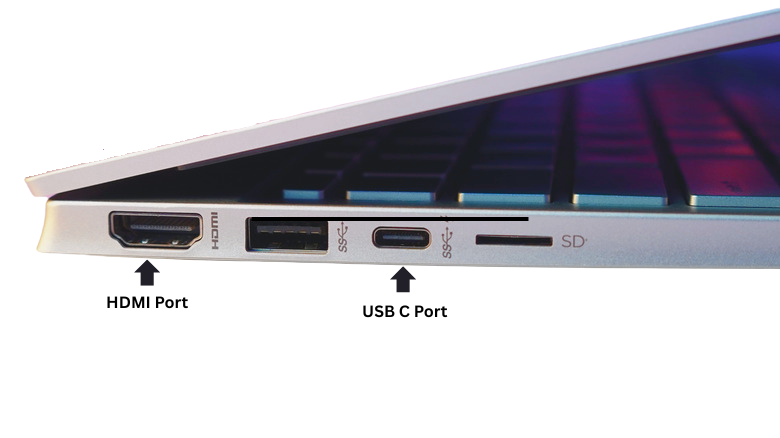
- HDMI — the most common; a flat, slightly tapered port. Connects directly to almost any projector or TV.
- USB-C / Thunderbolt — common on newer and thinner laptops (and all modern MacBooks). You'll need a USB-C to HDMI adapter or cable.
- Mini DisplayPort — found on some older laptops; needs a Mini DisplayPort to HDMI adapter.
- VGA — older projectors in offices and classrooms may only have this blue, 15-pin port. If your laptop is HDMI-only, you'll need an HDMI-to-VGA adapter (note: VGA carries video only, not audio).
Knowing your port tells you exactly which cable or adapter to buy.
Which Cable or Adapter Do You Need?
| Laptop Port | Projector/TV Port | What You Need |
|---|---|---|
| HDMI | HDMI | HDMI Cable |
| USB-C | HDMI | USB-C to HDMI adapter or cable |
| Thunderbolt 3/4 | HDMI | USB-C/Thunderbolt to HDMI adapter |
| Mini DisplayPort | HDMI | Mini DisplayPort to HDMI adapter |
| HDMI | VGA Projector | HDMI to VGA adapter |
| USB-C | VGA Projector | USB-C to VGA adapter |
Step 2: Connect by HDMI Cable (The Reliable Way)
A cable is the most dependable method — no Wi-Fi, no lag.
- Plug one end of the HDMI cable into your laptop (or into your USB-C adapter, then into the laptop).
- Plug the other end into one of the HDMI input ports on the projector or TV. Note the port number (HDMI 1, HDMI 2, etc.).
- Turn on the projector or TV.
Step 3: Select the Right Input Source
This is where most people get stuck. The TV or projector won't automatically show your laptop — you have to tell it where to look:
- Pick up the projector/TV remote and press the Source or Input button.
- Choose the HDMI number you plugged into (if you used HDMI 2, select HDMI 2).
If you still see "No Signal," it's almost always the wrong input selected here — cycle through the HDMI options.
Step 4: Choose How the Screen Displays (Windows)
Press Windows + P to open the projection menu, then choose:
- Duplicate — shows the same image on both screens. Best for presentations.
- Extend — treats the projector/TV as extra desktop space, so you can have notes on your laptop while the audience sees slides. Best for presenting like a pro.
- Second screen only — turns off your laptop screen and uses only the big display. Best for watching movies.
Step 4 (Mac): Choose How the Screen Displays
On a MacBook, the external display usually appears within a few seconds. To control it:
- Open System Settings > Displays.
- Choose Mirror Displays (same image) or arrange them side by side to extend.
- If using AirPlay to a smart TV, click the Screen Mirroring icon in the menu bar.
How to Connect Wirelessly (No Cable)
If you have a smart TV or a wireless-capable projector on the same Wi-Fi network:
- Windows: Press Windows + K to open Cast, then select your TV from the list. Your TV must support Miracast (most modern smart TVs do).
- Mac: Click the Screen Mirroring / AirPlay icon in the menu bar and choose your Apple TV or AirPlay-compatible TV.
Wireless is convenient but can lag slightly and depends on a stable connection — for an important presentation, a cable is safer.
HDMI vs Wireless Casting: Which Is Better?
| Feature | HDMI Cable | Wireless Casting |
|---|---|---|
| Reliability | Excellent | Good |
| Video Quality | Excellent | Good |
| Audio Sync | Perfect | Can Lag |
| Internet Required | No | Usually Yes |
| Presentations | Best Choice | Acceptable |
| Movies | Best Choice | Good |
Recommendation: For meetings, classrooms, and business presentations, HDMI remains the most reliable option.
What About Sound?
HDMI and USB-C carry both video and audio, so sound plays through the TV or projector automatically. If it doesn't:
- Windows: Right-click the speaker icon > Sound settings > choose the TV/projector as the output device.
- Mac: System Settings > Sound > Output > select the display.
(If you connected via VGA, there's no audio over that cable — you'll need a separate 3.5mm audio cable.)
Common Projector Connection Problems and How to Fix Them
A cheap or worn HDMI cable is a surprisingly common cause of flicker and "no signal." A good-quality HDMI cable and, for USB-C laptops, a reliable adapter are inexpensive and save a lot of frustration — both are easy to find on Amazon.ae.
And if your laptop is the bottleneck — old ports, no HDMI, struggling to drive an external display — it may be time to upgrade. See our guide to the Best Laptops in UAE(opens in a new tab) for current options across every budget.
While you're setting up your laptop, you might also find these useful: how to take a screenshot on laptop & PC(opens in a new tab) and how to screen record on a laptop(opens in a new tab).
If your laptop won't connect to a projector or TV, don't worry — most connection issues can be fixed in a few minutes. Below are the most common problems and their solutions.
No Signal on the Projector or TV
If your projector or TV displays a "No Signal" message, the most common cause is an incorrect input source.
How to fix it:
- Press the Source or Input button on the projector or TV remote.
- Select the exact HDMI port your cable is connected to (HDMI 1, HDMI 2, etc.).
- Make sure the HDMI cable is firmly plugged in at both ends.
- Try unplugging and reconnecting the cable.
- Test a different HDMI port if available.
Laptop Connected but No Sound
HDMI and USB-C connections normally carry both video and audio. If the picture appears but there's no sound, your laptop may still be using its built-in speakers.
Windows:
- Right-click the speaker icon.
- Open Sound Settings.
- Under Output, select your TV or projector.
Mac:
- Open System Settings > Sound.
- Select the connected display as the output device.
HDMI Connected but Screen Is Blank
Sometimes the display is detected but not shown correctly.
Windows:
- Press Windows + P.
- Select Duplicate, Extend, or Second Screen Only.
Mac:
- Open System Settings > Displays.
- Choose Mirror Displays or extend the desktop.
If the screen remains blank, restart both devices and reconnect the cable.
Image Is Blurry, Fuzzy, or the Wrong Size
A blurry display is usually caused by an incorrect resolution setting.
How to fix it:
- On Windows, open Display Settings and set the resolution to the display's recommended value.
- On Mac, open Displays and select the default or recommended resolution.
- Ensure the projector or TV supports the chosen resolution.
For best results, use Full HD (1920×1080) or the native resolution of your display.
USB-C to HDMI Adapter Not Working
Not all USB-C ports support video output. Some are designed only for charging or data transfer.
How to fix it:
- Check whether your laptop supports DisplayPort Alt Mode.
- Try another USB-C port if your laptop has multiple ports.
- Use a certified USB-C to HDMI adapter.
- Test the adapter with another display.
Laptop Won't Detect the Projector or TV
If nothing happens after connecting the cable:
- Disconnect and reconnect the cable.
- Restart both the laptop and the projector.
- Update your graphics drivers.
- Press Windows + P and select a display mode.
- On Mac, open Displays and click Detect Displays if available.
Wireless Casting Not Working
If you're trying to connect without a cable:
- Ensure both devices are connected to the same Wi-Fi network.
- Restart the TV, projector, and laptop.
- Update your TV firmware.
- Verify that your TV supports Miracast (Windows) or AirPlay (Mac).
For important presentations, an HDMI connection is usually more reliable than wireless casting.
Quick Troubleshooting Checklist
Before replacing cables or adapters, check these basics:
✅ Correct HDMI input selected
✅ Cable firmly connected
✅ Display mode set correctly (Windows + P)
✅ Recommended screen resolution selected
✅ Audio output set to the projector or TV
✅ USB-C port supports video output
✅ Both devices restarted
In most cases, one of these steps resolves projector and TV connection problems within minutes.The Right Gear Makes It Painless
How to Connect Popular Laptop Brands to a Projector or TV
Dell Laptop
Most modern Dell laptops include HDMI or USB-C ports. Connect the cable, then press Windows + P and choose Duplicate or Extend.
HP Laptop
HP laptops typically support HDMI output directly. For USB-C-only models, use a USB-C to HDMI adapter.
Lenovo Laptop
ThinkPad and IdeaPad models may use HDMI, USB-C, or both. Select the correct input source on the projector.
ASUS Laptop
ASUS laptops generally support HDMI output. Gaming models may support multiple external displays.
MacBook
Modern MacBooks require USB-C or Thunderbolt to HDMI adapters unless using AirPlay wirelessly.
How Do I Connect My Laptop to a Projector Quickly?
- Connect an HDMI cable between the laptop and projector.
- Turn on the projector.
- Select the correct HDMI input.
- Press Windows + P.
- Choose Duplicate.
- Start presenting.
How to Connect a Laptop to Popular Projector Brands
The steps for connecting a laptop are broadly similar across projector brands, but the menu names and input-selection process can vary slightly. Here's what to expect with some of the most popular projector brands available in the UAE.
Connect a Laptop to an Epson Projector
Epson projectors are widely used in classrooms, offices, and home theaters. Connect your laptop using an HDMI cable, then press the Source Search button on the projector or remote. Epson projectors will automatically scan for active inputs and display the connected laptop screen.
If the image doesn't appear, verify that the correct HDMI input is selected and press Windows + P on your laptop to choose Duplicate or Extend mode.
Connect a Laptop to a BenQ Projector
BenQ projectors typically include multiple HDMI ports and are popular for presentations and home entertainment. After connecting the HDMI cable, press the Source button on the remote and choose the appropriate HDMI input.
For best image quality, set your laptop's display resolution to match the projector's native resolution.
Connect a Laptop to a ViewSonic Projector
ViewSonic projectors support HDMI, VGA, and sometimes wireless casting. After connecting your laptop, select the active HDMI source from the projector menu.
If you're using an older ViewSonic model with VGA, remember that VGA carries video only and requires a separate audio connection.
Connect a Laptop to an Optoma Projector
Optoma projectors are commonly used for movies, gaming, and business presentations. Connect the HDMI cable, turn on the projector, and choose the correct input source.
If you experience flickering or signal loss, try a high-quality HDMI cable, especially for longer cable runs.
Connect a Laptop to an Acer Projector
Acer projectors support standard HDMI connections and often include automatic source detection. Connect the cable, select the HDMI input, and configure the display mode on your laptop.
For presentations, Duplicate mode is usually the best option, while Extend mode provides additional workspace.
Do Different Projector Brands Require Different Setup Steps?
No. Whether you're using Epson, BenQ, ViewSonic, Optoma, Acer, or another brand, the basic process remains the same:
- Connect the laptop using HDMI or USB-C.
- Turn on the projector.
- Select the correct input source.
- Configure Duplicate, Extend, or Mirror mode.
- Adjust the resolution if necessary.
Most connection problems are caused by incorrect input selection, unsupported adapters, or display settings rather than the projector brand itself.
Recommended Accessories for Connecting a Laptop to a Projector
- High-Speed HDMI Cable (opens in a new tab)
- USB-C to HDMI Adapter(opens in a new tab)
- USB-C Multiport Hub (opens in a new tab)
- Wireless Presentation Clicker (opens in a new tab)
- Portable Projector Screen(opens in a new tab)
- HDMI Extension Cable(opens in a new tab)
The Right Gear Makes It Painless
A cheap or worn HDMI cable is a surprisingly common cause of flicker and "no signal." A good-quality HDMI cable and, for USB-C laptops, a reliable adapter are inexpensive and save a lot of frustration — both are easy to find on Amazon.ae(opens in a new tab).
And if your laptop is the bottleneck — old ports, no HDMI, struggling to drive an external display — it may be time to upgrade. See our guide to the Best Laptops in UAE(opens in a new tab) for current options across every budget.
More Laptop Productivity Guides
After connecting your laptop to a projector or TV, you may also find these guides useful:
- Top 10 Laptops in UAE in 2026 for work, study, and entertainment(opens in a new tab).
- How to extend your laptop display for a permanent dual-screen setup.(opens in a new tab)
- How to create screen recordings for presentations and demonstrations(opens in a new tab).
- How to take screenshots during meetings, classes, and presentations(opens in a new tab).