The Quick Answer
Connecting a second monitor takes three steps:
- Plug a cable (HDMI, USB-C, or DisplayPort — whichever your laptop has) from the laptop into the monitor.
- On the monitor, select the matching input source.
- On your laptop, press Windows + P (Windows) → Extend, or open Displays in System Settings (Mac).
That's it for most setups. If the monitor stays black, the fixes are at the bottom.
Step 1: Check What Ports You Have
Look at the sides of your laptop and the back of your monitor — you need a cable (or adapter) that matches both:
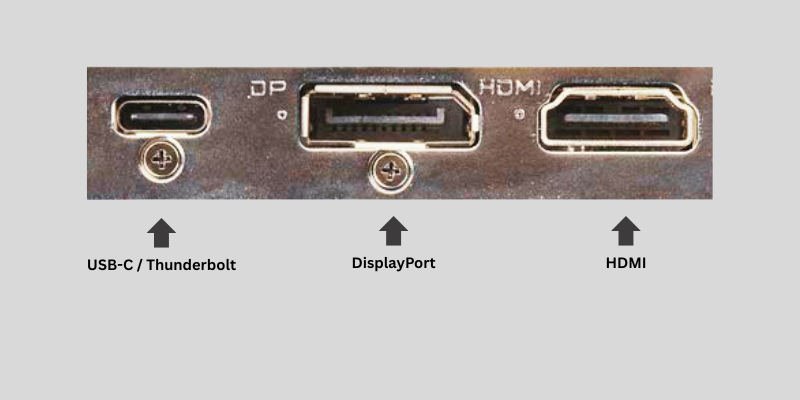
- HDMI — the most common on both laptops and monitors. Direct HDMI-to-HDMI cable.
- USB-C / Thunderbolt — common on modern and thin laptops (and all recent MacBooks). Many monitors now have USB-C input too; if not, use a USB-C to HDMI cable or adapter.
- DisplayPort — common on dedicated monitors, especially higher-refresh ones. If your laptop has HDMI but the monitor has DisplayPort, an HDMI-to-DisplayPort adapter bridges them.
The cable you need is simply whatever connects your laptop's port to your monitor's port — most often a plain HDMI cable, or a USB-C to HDMI one.
What Cable or Adapter Do You Need?
| Laptop Port | Monitor Port | What You Need |
|---|---|---|
| HDMI | HDMI | HDMI Cable |
| USB-C | HDMI | USB-C to HDMI Adapter or Cable |
| USB-C | DisplayPort | USB-C to DisplayPort Cable |
| Mini DisplayPort | HDMI | Mini DisplayPort to HDMI Adapter |
| Thunderbolt | USB-C Monitor | USB-C Monitor |
Buying Tip
If you're unsure, check your laptop model online or look for the symbols next to the port.
For modern laptops, a USB-C monitor is often the cleanest solution because a single cable can carry video, data, and charging.
- HDMI cables(opens in a new tab)
- USB-C hubs(opens in a new tab)
- USB-C to HDMI adapters(opens in a new tab)
- Docking stations(opens in a new tab)
Step 2: Connect the Cable and Power On
- Plug one end into your laptop (or into your USB-C adapter, then the laptop).
- Plug the other end into the monitor's input port.
- Turn the monitor on.
Step 3: Select the Monitor's Input Source
Just like a TV, the monitor won't show your laptop until you point it at the right input:
- Use the monitor's physical buttons or joystick (usually on the back or underside) to open its menu.
- Choose the input you plugged into — HDMI 1, HDMI 2, USB-C, or DisplayPort.
If the monitor says "No Signal," this is almost always the cause — select the correct input.
Step 4: Set How the Display Works (Windows)
Press Windows + P and pick:
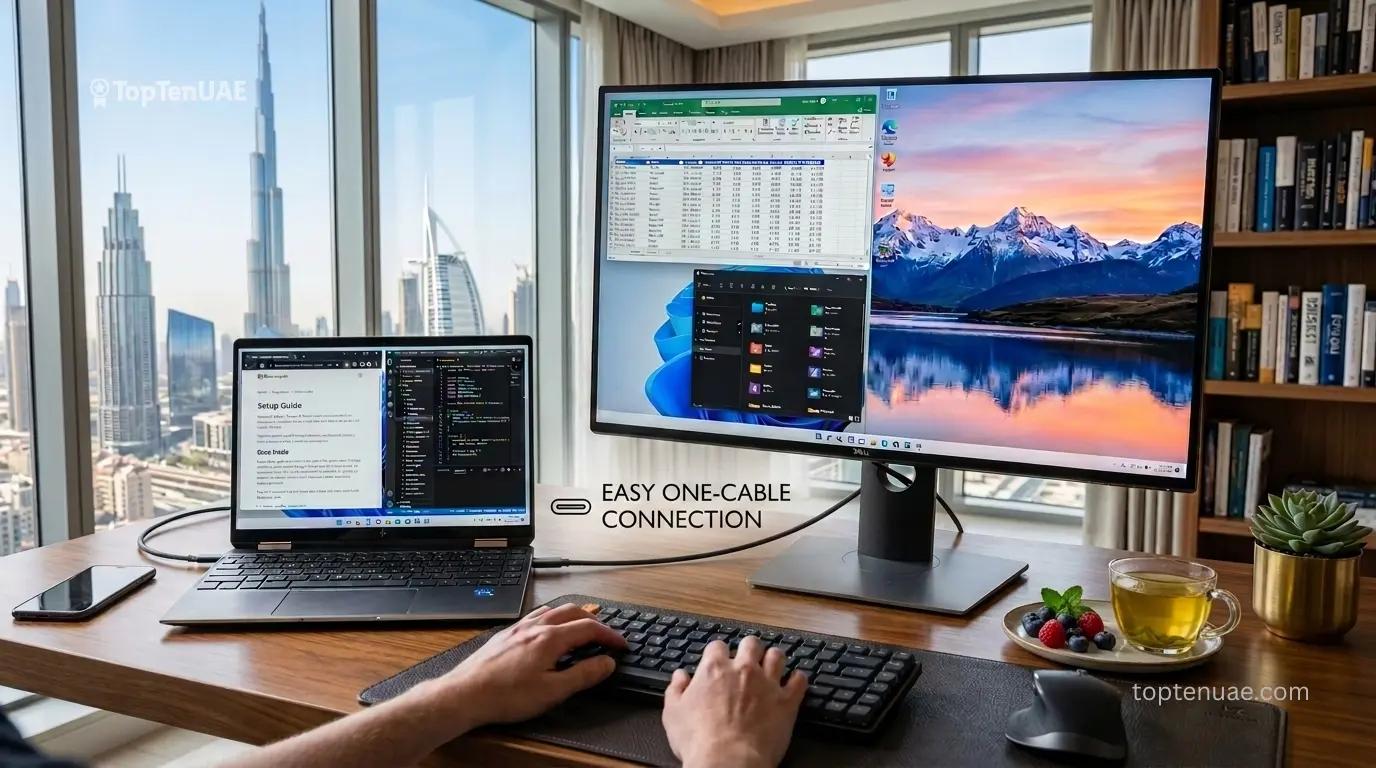
- Extend — the most useful mode. Your monitor becomes additional desktop space, so you can drag windows across and work on both screens. This is what makes you faster.
- Duplicate — mirrors the same image on both. Useful for presentations.
- Second screen only — uses just the monitor (handy with the laptop lid closed and an external keyboard).
To fine-tune: right-click the desktop > Display settings. Here you can drag the two screens to match their real positions, set which is the main display, and adjust resolution and scaling if text looks too small or large.
Step 4 (Mac): Set Up the Display
- Open System Settings > Displays.
- Your MacBook should detect the monitor automatically.
- Choose Extend (more space) or Mirror (same image).
- Drag the display boxes to match your physical layout, and pick which screen holds the menu bar (your main display).
To use the monitor with the lid closed (clamshell mode), keep the MacBook plugged in and connect an external keyboard and mouse.
Step 5: Arrange Your Workspace
Once both screens work, position windows for how you actually work — for example, your main task on the monitor and email or notes on the laptop. On Windows, snap windows with Windows + Arrow keys; on Mac, drag to the screen edges or use Mission Control.
Why a Second Monitor Makes You More Productive
A second monitor lets you:
- Keep email open while working
- Compare documents side-by-side
- Attend video calls while taking notes
- Research without constantly switching windows
For students, professionals, and remote workers, a dual-screen setup is often the cheapest productivity upgrade available.
Quick Fixes When the Monitor Won't Show
- "No Signal" / black screen: Wrong input source — re-check Step 3. Confirm the cable is firmly seated at both ends.
- Detected but no image: Press Windows + P again and select Extend; on Mac, open Displays and click "Detect Displays" (hold Option to reveal it).
- Wrong resolution / blurry: Set the monitor's native resolution in Display settings (Windows) or Displays (Mac).
- USB-C does nothing: Not all USB-C ports output video — try the other port, and ensure your adapter/cable supports video (DisplayPort Alt Mode).
- Monitor flickers: Usually a loose or low-quality cable — reseat it or try a different one.
Common Mistakes When Connecting a Second Monitor
- Selecting the wrong monitor input
- Using a USB-C port that doesn't support video
- Using low-quality adapters
- Choosing the wrong resolution
- Forgetting to enable Extend mode
Choosing a Monitor That Works Well With Your Laptop
If you're buying a monitor to pair with your laptop, a few things matter more than the rest:
- Connection match: A monitor with USB-C input is ideal for modern USB-C laptops — a single cable can carry video and charge the laptop. Otherwise, make sure it has HDMI.
- Size and resolution: A 24-inch 1080p monitor(opens in a new tab) is a great, affordable everyday upgrade; 27-inch 1440p(opens in a new tab) gives noticeably sharper, roomier space for work.
- For everyday work and study, you don't need a high-refresh gaming panel — a clear, well-sized IPS screen is the better value.
You can find monitors across all of these types on Amazon.ae. And if it's actually your laptop holding you back — old ports, can't drive an external display smoothly — see our guide to the Best Laptops in UAE(opens in a new tab) for capable options.
Complete Your Laptop Setup
A second monitor is one of the best productivity upgrades, but you can get even more from your laptop with these practical guides:
- Looking for a faster or more capable device? See our guide to the Best Laptops in UAE.(opens in a new tab)
- Need a larger display for presentations? Learn how to connect a laptop to a projector or TV.(opens in a new tab)
- Want to create tutorials or save meetings? See how to screen record on a laptop.(opens in a new tab)
- Need to capture information quickly? Learn how to take a screenshot on a laptop or PC.(opens in a new tab)